Simple Field Changes Using The Workflow Engine

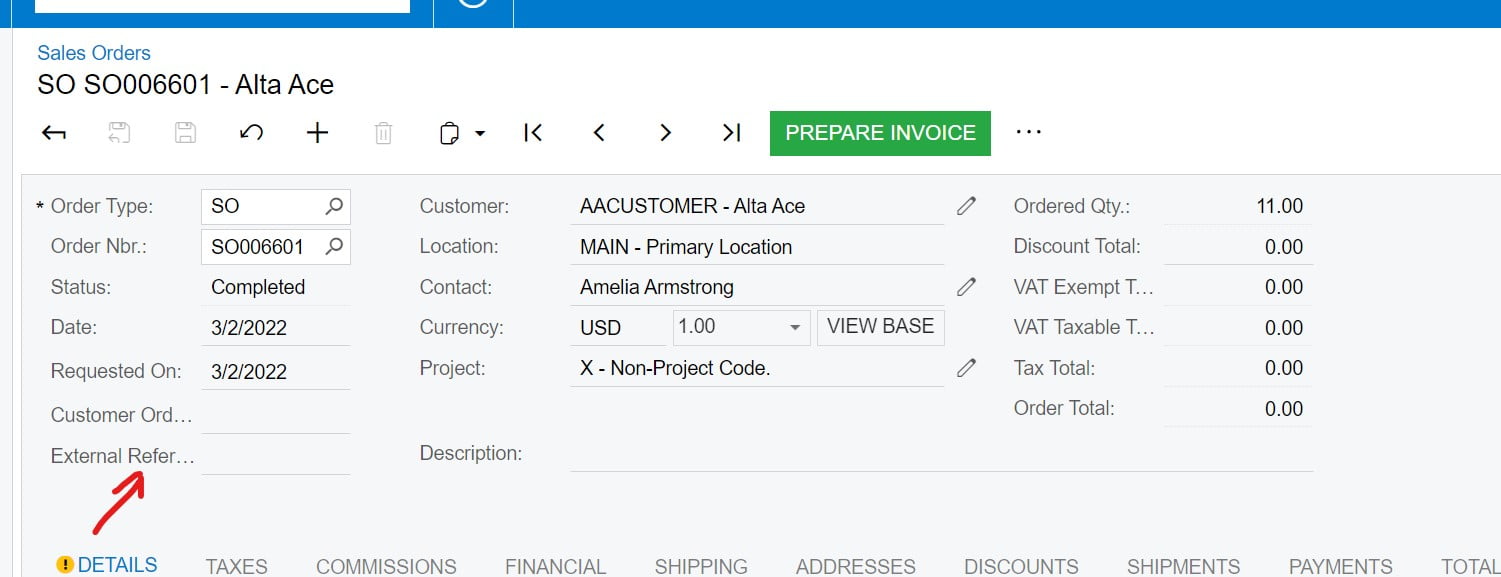
Recently, an ISV product I was working on required the External Ref Nbr. Field to be enabled at all times regardless of the document status. I wanted to share with you a few walls that I bounced off of so perhaps you dont have to.

Firstly, make a graph extension for the sales order screen, and override the configure method. Here is the code snippet the configure method. the fs.AddField<>()

        public override void Configure(PXScreenConfiguration configuration)
        {
            var context = configuration.GetScreenConfigurationContext<SOOrderEntry, SOOrder>();
            context.UpdateScreenConfigurationFor(
                c => c.WithFlows(flowContainer =>
                {
                    flowContainer
                        .Update(SOBehavior.SO, df => df
                            .WithFlowStates(fls =>
                            {
                                fls.Update<SOOrderStatus.completed>(flsc => flsc
                                    .WithFieldStates(fs => fs.AddField<SOOrder.customerRefNbr>()));
                                fls.Update<SOOrderStatus.shipping>(flsc => flsc
                                    .WithFieldStates(fs => fs.AddField<SOOrder.customerRefNbr>()));
                            }));
                }));
        }

Now, the traps start. If you have any experience with the workflow engine, you will probably be like “this is very normal and going to be a very short blog post”. But you will find that simply doing this will not enable the field when the document is “Completed” or “Shipping”. Argghhh, what else?

Gotcha #1 – Using a Second Order Graph Extension

Make sure you are using a second order extension, including a workflow extension reference in your extension. Without this, the workflow will configure properly:

    public class IntercoSOOrderExt : PXGraphExtension<WorkflowSO, SOOrderEntry>
    {
        public override void Configure(PXScreenConfiguration configuration)
        {
            var context = configuration.GetScreenConfigurationContext<SOOrderEntry, SOOrder>();
            context.UpdateScreenConfigurationFor(
                c => c.WithFlows(flowContainer =>
                {
                    flowContainer
                        .Update(SOBehavior.SO, df => df
                            .WithFlowStates(fls =>
                            {
                                fls.Update<SOOrderStatus.completed>(flsc => flsc
                                    .WithFieldStates(fs => fs.AddField<SOOrder.customerRefNbr>()));
                                fls.Update<SOOrderStatus.shipping>(flsc => flsc
                                    .WithFieldStates(fs => fs.AddField<SOOrder.customerRefNbr>()));
                            }));
                }));
        }
}

I am referring to specifically the PXGraphExtension<SOOrderEntry_Workflow, SOOrderEntry> call. Usually, graph extensions are simply marked as PXGraphExtension<BaseGraph>, but in the case of changing workflow via code, one must include the Workflow extension as a type parameter as well.

Gotcha #2 – Non Workflow Considerations

After gotcha #1, you probably would have been thinking all is good. However, there are some non workflow considerations. In the base SalesOrderEntry graph, when the order is completed, the caches are actually set “AllowUpdate” = false. So unless you knew to look for this too, then you would have been frustrated by your lack of progress. Override the rowselected event as follows, and additionally perform this. I thought initially that the workflow would handle everything, however more traditional methods of enabling fields sometimes are also required. Screens like the purchase order screen or other more simple screens usually don’t require this.

        public virtual void SOOrder_RowSelected(PXCache cache, PXRowSelectedEventArgs e, PXRowSelected baseN)
        {
            baseN(cache, e);
            SOOrder doc = e.Row as SOOrder;

            if (doc == null)
            {
                return;
            }
            cache.AllowUpdate = true;
            PXUIFieldAttribute.SetEnabled<SOOrder.customerRefNbr>(cache, null, true);
        }

I hope these code snippets help you override the sales order screen. Happy Coding!

Enabling Parallel Processing on Acumatica Processing Screens

Acumatica, positioned as a mid-market ERP, can be deployed for a wide variety of companies – large, medium, or small. As companies experience growth, the amount of data it needs to manage grows.  However, in my experience developing custom code on the Acumatica platform, I find a significant number of organizations I work with punching above their weight when it comes to managing and processing data.

Read the rest of the post on the Acumatica Developer Blog here: Enabling Parallel Processing on Acumatica Processing Screens – Acumatica Cloud ERP

Creating a New Notification in Acumatica

I recently received a new request from a client who wanted additional notification functionality on the sales order screen. They manufacture items for their customers on a made-to-order basis. In the manufacturing process, every item must be sent off to a single vendor for the finishing step. Therefore, it is important for them to make sure that the vendor knows about all incoming sales orders and promise dates so they can plan accordingly. They wanted an action that would send an abbreviated sales order report off to that vendor.  I will share with you how I did it.

Read the rest on the Acumatica Developer Blog here: Creating a New Notification in Acumatica – Acumatica Cloud ERP

Syncing ShipStation data with the Acumatica Commerce Connector

A common integration companies with existing Shopify accounts have is to link Shopify directly to ShipStation for label generation and management. Product availability is managed inside of Shopify. Once they graduate to a more feature rich ERP however, the inventory is managed inside of the ERP instead of Shopify, with Shopify and Shipstation being extensions of the core ERP.

I recently implemented a Commerce Edition install of Acumatica who followed the pattern above. We used the out of the box Shipstation integration for Acumatica, and the Commerce Edition for talking to Shopify. One of the pain points we ran into was getting the ShipStation tracking and carrier information back into Shopify. Acumatica only allows you to map from the following field (as of 2021R2):

The Carrier is synced from the ShipVia field
The tracking number is synced from the Tracking Number screen on the Packages tab

This would be all well and good if the customer was using the out of the box Carrier Integration from Acumatica. However, their shipment info writes here:

Additionally, the ability to map to any shipment fields is not implemented yet (again, as of 2021R2). How I solved this is with a simple SOShipmentEntry customization, when the shipstation fields are updated, it creates a package and assigns the written tracking number to it (be sure all your ship vias have the “DEFAULT” box assigned to them):

Additionally, I created a cross reference between the ShipVia and the carrier field, because unless your ship via is exactly “USPS” “UPS” or “Fedex” it will not tell shopify what the carrier is properly. You should create the substitution list with exactly the same ID:

And now, when your shipments sync using the Commerce connector, the tracking info will populate from ShipStation properly!

Customizing the Acumatica Portal

UPDATE : 2021R1 as implemented a suite of upgrades to Portal Customization and these tricks are no longer required

I just recently got asked to develop a series of modifications to the Acumatica self service portal (2019 R2). After a cursory glance I saw “oh there are customization projects that can be installed, this will be exactly the same as customizing the base version”, however there were a few things that tripped me up that maybe I can pass along and help you.

After a little trial and error, here are the steps I took to successfully adding a new page to the Self Service Portal: (If you already have an existing instance skip the first 3 steps)

1. Install Acumatica ERP normally

2. Setup the Admin password by using username: Admin and password: Setup

3. I cleared out the sales demo customizations just to be safe but this probably isn’t necessary

4. Install the portal using the Acumatica config tool, selecting the database that your main ERP instance is running on, but then choosing the “Create Portal” radio button (prev versions have a checkbox), I personally made a virtual directory under the main instances ERP site

5. Navigate to Administration=>Customization Projects and Add a new project, hit save and click on the link expecting the Customization browser to appear

6. Flip over your desk when it denies you access even when you are logged into ‘the almighty admin account’

7. Thanks to Kurt Bauer and Brendan Hennelly on stackoverflow for providing the following SQL Script that will solve this problem:

INSERT INTO dbo.PortalMap
(

CompanyID,
Position,
Title,
Description,
Url,
ScreenID,
CompanyMask,
NodeID,
ParentID,
CreatedByID,
CreatedByScreenID,
CreatedDateTime,
LastModifiedByID,
LastModifiedByScreenID,
LastModifiedDateTime,
RecordSourceID

)

SELECT CompanyID,
Position,
Title,
Description,
Url,
ScreenID,
CompanyMask,
NodeID,
ParentID,
CreatedByID,
CreatedByScreenID,
CreatedDateTime,
LastModifiedByID,
LastModifiedByScreenID,
LastModifiedDateTime,
RecordSourceID

FROM dbo.SiteMap
WHERE ScreenID = 'AU000000'
AND NOT EXISTS
(

SELECT *
FROM dbo.PortalMap
WHERE CompanyID = dbo.SiteMap.CompanyID
AND ScreenID = dbo.SiteMap.ScreenID

);

For your information: the ERP and Portal share the same database, but when it comes to their respective site maps, they use two different tables: ERP => SiteMap Portal => PortalMap. This will cause an additional problem that we will explore later.

8. Close all your browser windows, open up cmd and use the iisreset command to reset the application if you are installing this on a local development machine like me. Otherwise, reset the application in however other way you need to

9. Now the customization project browser opens normally!

10. Go to Pages=>New Page and you will see the familiar popup appear.

11. However after filling out the popup as normally and clicking ok, you will notice the page does not appear properly in the “Pages” grid

12. Just delete the blank record that appears, and delete the corresponding sitemap entry as well in the sitemap section
– From what I gather, the entire sitemap section in the customization project is mapped to writing things into the “SiteMap” table and doesn’t do anything to the PortalMap table. We will need to add things in manually. So this record in the grid does nothing for the portal. Additionally you cant manage the sitemap using the manage site map button here anyway, so really its better if we just pretend this whole section doesn’t exit.

13. Go to Administration=>Portal Map and manually add your new page to the “Portal Map”

14. Now you can add the page normally to the Modern UI and it will work properly

Its highly likely that this is only the start of the wrinkles that one must face when customizing the portal, so I will continue to fill you in as I go along.

Report History

Just recently a VAR that I have been working with began training one of his resellers’ salespeople on the the custom price multiplier I have been developing. Naturally, the salespeople have lots of wants and desires, and there were a few small features missing that had to be added.

This highly specific customer pricing required a “Price List” report generated from items chosen off the price multiplier screen. These reports would be emailed to the customer contact.

But what if the salesperson was out for vacation and the customer had lost the PDF? Its obvious that a medium-term cache of these price lists was needed.

The sales person generates the Price List as one would create a report normally, using the Reports drop down

When the Report is generated, a record in this table is created, and the file is attached using the PXNoteAttribute functionality so that it is tied to the document management system

Thanks to Sergey for providing extremely helpful explanation on how to do this

Get Report PDF file Programatically
How to pass a Report Parameters from a Screen

Acumatica Test SDK – File Load Exception Solution

I recently downloaded a copy of Acumatica’s Test SDK and began running through the pdf class. After writing the first classes test, I came across a maddening FileLoadException involving TestApiCore.dll

This is due to Windows determining the location of the .dll coming from a internet source, and attempting to sandbox it into running with a limited set of permissions. To temporarily fix it you can right click on the dll and select Unblock under the General tab, but this is inefficient because there are several files that are flagged in this way.

Instead, user the following Powershell command:
dir C:\*YourTestSDKDir*\TestProject\*.* | Unblock-File -confirm

Be sure to use the path pointing to the downloaded files, not to your projects \bin\ folder, because Visual Studio copies several .dlls from the TestProject folder of the TestSDK directory, and the files that overwrite s will continue to have this flag applied

Customer Specific Iteration of ‘On the Fly Pricing’

A reseller came to us with a customer that had a desire for very fine tuned pricing by customer. It was very important for them that the custom system distill the Customer Discounts screen (AR209500) down into an even easier checkbox array to quickly apply the relevant base pricing, and from there use what ended up being called the “Price Multiplier” while the salesperson was on the phone negotiating pricing.

The workflow is as follows:

Modification of AR303000
Custom tab added on AR303000

After entering the customer information a user can navigate to the “Discount Levels Screen”. This customer wanted discount codes to match one for one with their Item Price Classes, with Sequences A, B, C, D and E. A percentage shows the discount percent for that sequence. Currently we have not added any information about quantity breaks but we may add that functionality in at a later date.

The same customer now seen in AR209500 applied to the correct discount

One can then fine tune this discount even further by hitting the ‘Open Price Multiplier’ button on AR303000, and the following custom screen appears. In the screenshot the system automatically has populated the customer and the user has selected a Price Class ID to filter by, and the respective items have been populated in the grid.

The Price Multiplier

Only the last three fields are editable (Margin, Multiplier, Multiplied Price). If a user wants to set a specific margin, the remaining fields are calculated in kind. If the user has a specific factor (they want the price 1.2x more expensive) they use the ‘multiplier column’, and if they simply want to choose any price they can using the final column.

Additionally, ‘Current Price Source’ and ‘Current Price Code’ tell the user where the current pricing has come from, whether it is the list price, list minus a discount code, or from a previous multiplier sheet. A release button makes the open Price Multiplier sheet active, and obsoletes any previous released Price Multiplier sheet with an identical Customer and Price Class ID.

Sales order with a multiplied Item
Creating a sales order

As you can see above, the price of the item for the customer we have been working with throughout all the screenshots shown (ABCVENTURE) reflects the price set in a released price multiplier sheet (it was intentionally set to zero dollars).

While this specific modification is very specific to a single customers needs, I hope it gives you inspiration on how you may apply something similar to another process that is a sticking point for a company you may be working with.

Here’s to a smooth implementation
-Kyle

REST API Web Endpoint Quick Guide

Version 0.4
Written By: Kyle Vanderstoep

This document was intended for quick reference with regards to the most common fields you want to access from the web endpoint. For more in-depth help, take a look at the section titled “Working with the Contract-Based REST API” located here: API HELP

Authentication

Login

Type: POST
Format: JSON
URL: <URL>/entity/auth/login
BODY:

    {
        "name" : "admin",
        "password" : "123",
        "company" :  ""
    }

Logout

Type: POST
Format: JSON
URL: <URL>/entity/auth/logout
BODY: None

Inventory Items

All Stock Items

Type: GET
Format: JSON
URL: <URL>/entity/Default/17.200.001/StockItem

Check an item’s Onhand Quantity

Type: PUT
Format: JSON
URL: <URL>/entity/17.200.001/InventoryAllocationInquiry
BODY(replace “ELEHDD2” with the InventoryID(s) you want to Query):

{
     "InventoryID": {"value": "ELEHDD2"}
}

Add a $select query parameter to the request to select any specific fields from the report you want to narrow down

Customers

Add a Customer

Type: PUT
Format: JSON
URL: <URL>/entity/Default/17.200.001/Customer
Body:
{
  "CustomerID" : {value : "JOHNGOOD" } ,
  "CustomerName" : {value : "John Good" },
  "MainContact" :
   {
      "Email" : {value : "demo@gmail.com" },
      "Address" :
        {
          "AddressLine1" : {value : "4030 Lake Washington Blvd NE" },
          "AddressLine2" : {value : "Suite 100" },
          "City" : {value : "Kirkland" },
          "State" : {value : "WA" },
          "PostalCode" : {value : "98033" }
        }     
    } 
}

Additionally, fields ‘ShippingContact’ and ‘BillingContact’ can be specified separately from ‘MainContact’ shown above. If these are not specified then a new PurchaseOrder will use the MainContact as both.

Retrieving Customer data

Type: GET
Format: JSON
URL: <URL>/entity/Default/17.200.001/Customer

Use query parameter $filter: To specify filtering conditions
Use query parameter $expand: To expand specific detail entities
Otherwise all current customer data will be sent

Update Existing Customer

Type: PUT
Format: JSON
URL: <URL>/entity/Default/17.200.001/Customer

Use parameter $filter: To specify filtering conditions on key fields that identify the record to be updated
Key Field: CustomerID (string(10))
Example:
URL: <URL>/entity/Default/17.200.001/Customer?$filter=CustomerID eq ‘ABARTENDE’
Body:
{
      "CustomerName": {"value": "Stuffffff"}
}

This will update customer ABARTENDE’s name to ‘Stuffff’

Sales Orders

Add a Sales Order

Type: PUT
Format: JSON
URL: <URL>/entity/Default/17.200.001/SalesOrder
Body:
{
  "CustomerID" : {value : "JOHNGOOD"}
}

This will create a new sales order for the CustomerID chosen, and shipping information of their Primary ‘Location’

{
  "CustomerID" : {value :
"ABARTENDE"},
  "LocationID" : {value :
"VEGAS"}
}

This will create a new sales order for the CustomerID, at an alternate Location ID (applies to ‘Ship To Address’, BillToAddress will always default to the default ‘BillToAddress’ specified in the Customer Record (see this document’s relevant section under Customers):

This will create a new sales order for the CustomerID, using a ship to address that is not currently saved as a location under the CustomerID record (the same can be done with ‘BillToAddress’):

{
  "CustomerID" : {value : "ABARTENDE"},
  "ShipToAddressOverride": {"value": true},
  "ShipToAddress" : {
        "AddressLine1" : {value : "TEST 123"},
        "AddressLine2" : {value : "POBOX 123"},
        "City" : {value : "Seattle"},
        "Country" : {value : "US"},
        "PostalCode" : {value : "95073"},
        "State" : {value : "WA"},
  }

Update a Sales Order

Type: PUT
Format: JSON
URL: <URL>/entity/Default/17.200.001/SalesOrder

Use the same format as “Add a Sales Order”, however you must
specify existing records using query parameter $filter, or else a new record
will be added

Example:
PUT to <URL>/entity/Default/17.200.001/SalesOrder?$filter=OrderNbr eq ‘SO004573’

Body:
{
    "CustomerID" : {value : "ABCVENTURE"}
}

This sets Sales order # ‘SO004573’ value of CustomerID to ABCVENTUREKey Field: OrderNbr (string(10)

Status of a Sales Order

Date received, date entered into the system and current status
Open, closed, backordered, shipped
If shipped – shipping information

Cancel a Sales Order

Type: PUT
Format: JSON
URL: <URL>/entity/Default/17.200.001/SalesOrder/CancelSalesOrder

Body:
{
     "entity":
     {
      "OrderNbr": {"value": "SO004543"}
     }
}

You must create a new request in this format for every
SalesOrder you want to cancel

Further Documentation

Download the Acumatica provided swagger.json file for a full openAPI 2.0 documentation of the existing web endpoint here:

You can then use an Open Api GUI of choice to navigate it

Send a GET Request to any Endpoint with the addition of $adHocSchema to get a list of fields associated with it
Example:<URL>/entity/Default/17.200.001/SalesOrder/$adHocSchema